Meeting Dr. Jekyll
A look at how I made the most of Jekyll in building my website.
It’s no secret that my website is hosted on the wonderful GitHub Pages. There are many advantages to this - it’s free, easy to manage, linked directly to git, the list goes on.
It wasn’t until recently though that I heard about Jekyll. From my experience with it in the last few weeks, I’m incredibly impressed. Jekyll brings a static site (one where each page is typically hand-coded and updated) much closer to a dynamic one (which runs mostly from templates, pulling in data from a database). True dynamic sites have the disadvantage that they are slower and more expensive to host - Jekyll is just serving pre-made files, so it’s really quick and cheap.
Jekyll is essentially a parsing engine which sits between your actual files and the webserver. It scoops up the data you give it and transforms it into the actual webpage files. This brings in some really unique features - you can use templates to define a page layout, snippets of code to include as needed, and variables to allow for post-specific design tweaking.
In this post, I’m going to be looking at some of the ways I have utilised it.
Avoiding Hardcoding using Variables
I’m not new to programming, so I know that hardcoding values is a very bad thing. You don’t know when you will need to update a value. You may find suddenly that you need to update the precision of PI from 3.14 to 3.141592! If you had written 3.14 throughout your code, you would have to update every single one. If you miss one, expect bugs! Instead, it’s obviously a much better practice to use a variable, which can be referenced throughout the code as needed.
It seems to me that regular-old CSS involves a lot of hard-coding of values. Sure, you can just write that value in CSS once and reference the stylesheet many times, but what if you want to use the same colour for many different things? I imagine you’d find yourself copying the value over - hardcoding. The solution to this problem is CSS Preprocessors, but with Jekyll, you don’t need to. It can satisfy the functionality of a CSS preprocessor without adding another tool to your stack.
It might seem like a none-issue to most people, but for me I see being able to tweak one value and the whole site responding as an asset. Jekyll has allowed me to do this with it’s Yaml Variables, and doesn’t require me to fiddle around in the terminal between builds. Just save and go.
Jekyll uses Yaml in two places - in ‘Front Matter’ at the start of a file to be processed by Jekyll, and in the single file, _config.yml. For the task of site-wide variables, _config.yaml is important. This file allows you to set site-wide variables which you can reference in any jekyll-processed page using the ‘site’ variable - {{ site.variablename }}.
 Jekyll Font Variables
For my initial usage, I’m just using this to store the colours of my fonts - {{ site.style.text }} is and {{ site.style.highlight }} is . At the time of writing, they were “#cfcfc9” and “#d05d5d” respectively - if these two values are different to the previous two, then I decided to change my colours and the variables helped me do that easily!
 Jekyll Font Variables in use
Page and Layout specific CSS and JS
Jekyll’s templating system (called ‘layouts’) allows you to do a lot. My homepage and 404 page are using a template called ‘splashpage’, while my blog posts are using the ‘post’ template. Both of those templates are using the ‘default’ template, which adds the site’s navbar. The ‘default’ template then uses the ‘compress’ template, which minifies the html.
Jekyll’s layout system is okay, but it has a problem - the <head> tag block is only available in the template it is used in (in my case ‘default’). You may want to add something there from higher templates (eg stylesheets for ‘post’ and ‘splashpage’). Jekyll doesn’t provide a way of altering the head from a higher template.
Following advice from Matt Gemmell’s post here, I set up my ‘default’ template to contain liquid code in the head to add stylesheets and javascripts to the <head> element. The liquid logic given in Matt Gemmell’s post worked well if I wanted to include custom css or js in just the post, but if I wanted to include custom css or js in templates, I found that they did not appear. This is because layouts fall under a separate variable, {% layout %} rather than {% post %}. It seems that this was once not the case, and was a new feature introduced after Matt Gemell’s post was written.
---
layout: default
custom_css:
- splashpage
---
The naïve approach here would be two for-loops, one for page and once layout, but what if both post and layout include the same thing? It would mean that that asset would be fetched twice, and in the case of JavaScript, would be run twice! Obviously, we only want to loop through the set of items in page union layout; without duplicates.
Liquid is one of the more frustrating parts of Jekyll, and unfortunately the method you would need to join two arrays (concat) is not in Jekyll at this time.
I used the source code for concat to produce a Jekyll plugin that works like a true union. Unlike concat, my union method allows its argument to be nil and removes duplicates, both useful features for the problem I was trying to solve. If you’d like to, you can find that plugin here. Unfortunately, (and I didn’t realise this when I was writing my plugin), you can not use a custom Jekyll plugin when compiling on Github Pages, as they are disabled for security reasons. However, you can push your _site folder (which contains Jekyll’s processed output) to GitHub as if it were a non-Jekyll (read: regular ol’ boring static) site. For me, this isn’t a good solution as I really like Github Pages compiling for me.
 Custom CSS in my ‘default’ layout when using plugin
Neither the naïve solution of two for-loops, nor the plugin solution are optimal for the reasons given.
I didn’t want to accept either of these solutions, so I struggled to find a third. In the dark recesses of the Shopify site, I found my salvation. Whilst liquid 3.0.6 does not support appending to arrays, ‘Alex’ revealed a work around. I now keep an array of items I have seen, and don’t add the layout version if the array already contains it. The solution I wrote is available here. It’s a really ugly solution, but it is better than the alternatives. I’m using a slightly-modified version to include Javascripts, too, which makes my ‘default’ template long and unwieldy. I can’t wait for Jekyll to update the Liquid version so I can use concat!
Page-unique style and Templates
Specifying a custom stylesheet on a per-page basis is nice, but what if I want to include very small but specific snippets? A good example of the sort of thing I’m talking about here is images. Setting a background image for a page requires css styling. You might think it would be possible to insert variables into the stylesheet, to allow you to specify the styling and swap out the actual image url on a per-page basis, but this isn’t possible as a stylesheet is only rendered once - it has to be a single, fixed file.
Fortunately, <style> tags exist, and we can insert css into them using files in the _includes/ directory. As includes are inserted directly onto a page, they do not have to be a single fixed instance - they can use variables. I added <style> tags to my <head>, within which I included a modified version of the Liquid script I wrote about in the previous section. This script checks for the variable ‘custom_style_includes’ in the yaml front matter, and if present adds the specified css from the _includes/ directory, using {% include {{ style_include }}.css %}.
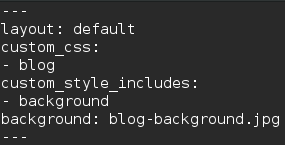 Custom style include to set the background on my blog
I can then use variables in the yaml front matter to specify the actual picture to be used in the included snippet.
Going Forward
I’d like to relegate more of my styling to variables, and finding chunks to cut out to move to _include/ files. This will hopefully allow me to maintain a consistent style across my site.
Jekyll is a very powerful tool, and I have a few things I’d like to try. I think it could be used well in ways it wasn’t intended to be.
P.S. I'm late to the party, but I recently got a twitter account that you can follow here.