On occasion, we might want to crop a set of images to the same area. Perhaps we’re making minor variations, and want to display them, or perhaps a website gives data in the same place for multiple pages, whatever.
Cropping them manually by hand would be very time consuming and error prone. Today we’ll look at a method using GIMP and ImageMagick’s mogrify tool.
Get the data from GIMP.
First, select the area that you want to crop to using the Rectangle Select Tool (Hotkey ‘R’). Just drag and adjust the rectangle over the portion of the image that you want to crop to.
Take a note of the Position and Size values in the Tool Options window (You might have to scroll down). If Tool Options isn’t showing, you can display it through Windows>Dockable Dialogs>Tool Options.
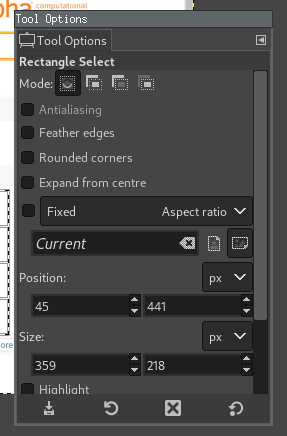
The two values under ‘Position’ are X and Y, and the two values under ‘Size’ and WIDTH and HEIGHT.
That’s all we needed GIMP for.
Replace File with Cropped Image
Next, we use the mogrify -crop command.
mogrify -crop WIDTHxHEIGHT+X+Y file1.png file2.png
In this tutorial, I am using the .png file format, but you can use any of the ImageMagick supported formats.
We can either use a wildcard (if we want to crop all files of the filetype in our current directory)…
mogrify -crop 359x218+45+441 *.png
…or we can list the individual files…
mogrify -crop 359x218+45+441 screenshot1.png screenshot2.png screenshot3.png
Note that Mogrify replaces the image with the cropped version! It does not create a new image!
Crop To New File
If you don’t want to replace the image with the cropped version, you’ll have to use the convert command, but that would prevent you from using wildcards so easily.
convert input.png -crop WIDTHxHEIGHT+X+Y output.png
…so we’d have to use a bash for loop to do that.
That might look something like this:
for image in *.png; do convert $image -crop WIDTHxHEIGHT+X+Y ${image%.*}_cropped.png; done
P.S. I'm late to the party, but I recently got a twitter account that you can follow here.