Polygraf
The story of the development of Polygraf, which went through many iterations and required several new skills.
Polygraf is a Eurorack module that was in development hell for a long time. The original version was designed in the summer of 2014, and it went through many iterations, being revisited in 2015, 2018, and 2019. The original version of this post was authored in 2015, and I’ve made edits to it since then as things developed. This is the story of Polygraf, from conception, to release.
Polygraf has had several names and forms.
The story behind how Polygraf came about is quite a humorous one. After having completed my work on Bartos Flur, I was looking at some existing modules by other manufacturers for inspiration, as I wanted something to work on for fun and for the experience. I wasn’t actually interacting with any of the modules, so I just had my interpretations of what a module might do to go on.
I decided to attempt to replicate a specific module that I had seen. If my interpretation was correct, I would make something similar to something that I knew customers already enjoyed. If I got it wrong, I might make something esoteric that is potentially interesting too.
I had no idea what the module that I saw actually did - I never touched it, played with it, nor analysed its functions. I simply looked at the front panel - and not particularly hard either! It was more that I had a vague memory of looking at it.
As can be expected from all this build up, my assumptions about how that module operated were completely wrong. The module was completely different from what I had assumed it was. It did not do anything that I thought it did. I even confused low-profile potentiometers for tactile switches.
Grid Machine
The circuit I designed after looking at the aforementioned module acted a bit like a drum machine crossed with a grid editor. I had never heard of a drum machine nor a grid editor at the time. We dubbed this design as the ‘Grid Machine’.
You could program in sequences which the PIC remembered in it’s EEPROM, and you could then play them back at any time. The Grid Machine was able to support 16 sequences with 16 steps of 8 binary outputs.
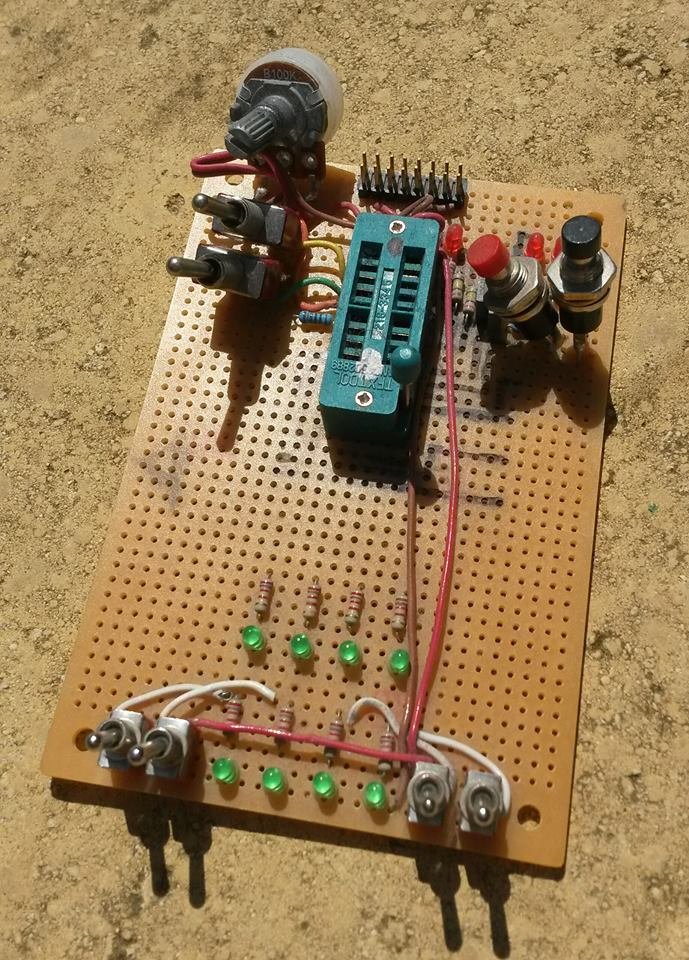 Grid Machine Prototype
The design and programming of Grid Machine was really fun to do. I was somewhat familiar with Assembly thanks to my work on the Bartos Flur, but the project was still quite challenging and I learned a lot about storage mediums and different PIC hardware modules.
Filesystem
The main software challenge for designing Grid Machine was to figure out how to store the data, and format it appropriately. I knew nothing about filesystems at this time, and essentially rolled my own very simple one whilst designing it. When I later learned about how File Allocation Tables worked, I marvelled at how the Grid Machine ‘filesystem’ was remarkably similar - albeit simplified.
I solved the challenge by working through the data I needed to store on paper and seeing what I would need. My thought process went a little like this:
For each step, I need to store the state of 8 binary outputs… Okay, I can store that really easily in a byte, with each bit representing a specific output being on or off. Each sequence can have 16 steps, so let’s allocate 16 bytes to each sequence for the actual pattern. But if we want a sequence to be able to terminate early, and perhaps be a shorter number of steps, then we need to have another piece of data that represents the sequence length. Let’s give each sequence an byte to denote which step it should stop at.
Very quickly the storage method materialised. One byte stored the length of the sequence, and it was followed by 16 bytes which contain the data for the outputs.
The PIC I was using had 256 EEPROM bytes, and as each sequence used 17 bytes, it was easy to see that I could have 15 sequences. I opted to hard-code an extra sequence in there to round it out to 16 sequences, as 16 is a much nicer number to work with.
In Reality…
I was really happy with the Grid Machine. I could encode/record different binary sequences into different storage locations on to the PIC, and it would play them back to me. I had a lot of fun recording and playing back patterns of blinking lights.
Triumphantly, I showed my prototype to my father, but he wasn’t as pleased with it as I was. The problem with the Grid Machine, he told me, was that the interface was not intuitive. If he couldn’t figure out how to use it from looking at it, it needs some work.
I tried explaining it to him, a music technology veteran, and he just looked at me blankly. He told me that I had designed a device that only I knew how to use, and that you would have to have a good understanding of binary to even attempt to understand it.
I thought these comments were unfair, but accepted that the interface could use improvement. And frankly, if you have to explain how something works, it’s probably not intuitive enough. Nobody needs to be taught how to use a smart phone, for example.
The project was discarded, despite being fully functional, and I forgot about it, for now.
Redesign
The next spring brought many changes. Frequency Central had decided that there was merit to the idea and had ideas about how to improve the interface.
If we outfit the project with a dual seven segment display, then you do not need to understand binary to use it. We could also represent other information to the user by flashing information onto the display. This would require sacrificing 4 of the outputs, as the PIC didn’t have enough I/O pins to support both seven segment displays and digital outputs. We also briefly renamed the project to ‘Event Horizon’ before switching to ‘Polygraf’.
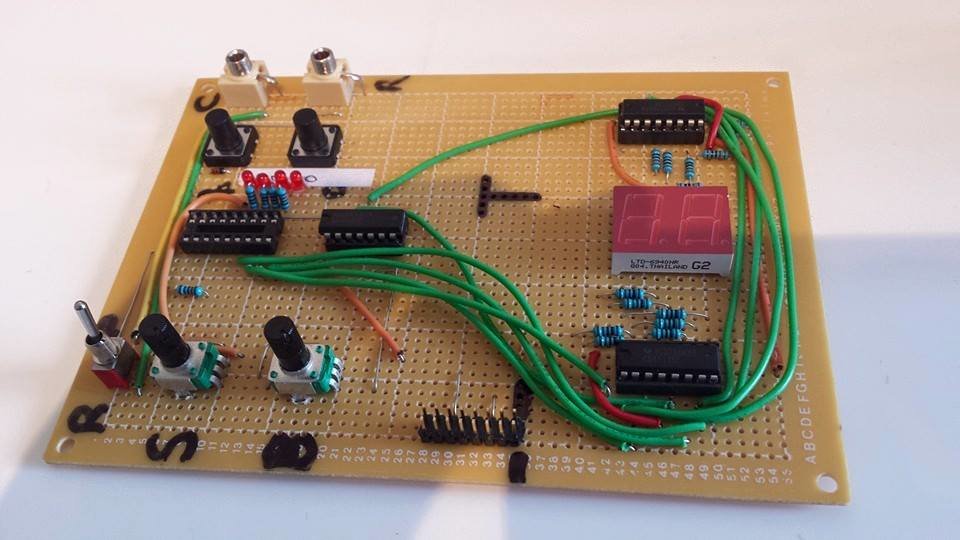 Polygraf Prototype Board
These changes revolutionised the project.
The interface would be much more usable, and by having only, we could now store 30 sequences in our EEPROM, as each slot for a previous sequence now represented two sequences. We could also have two pre-programmed sequences to make the number round out to an even 32.
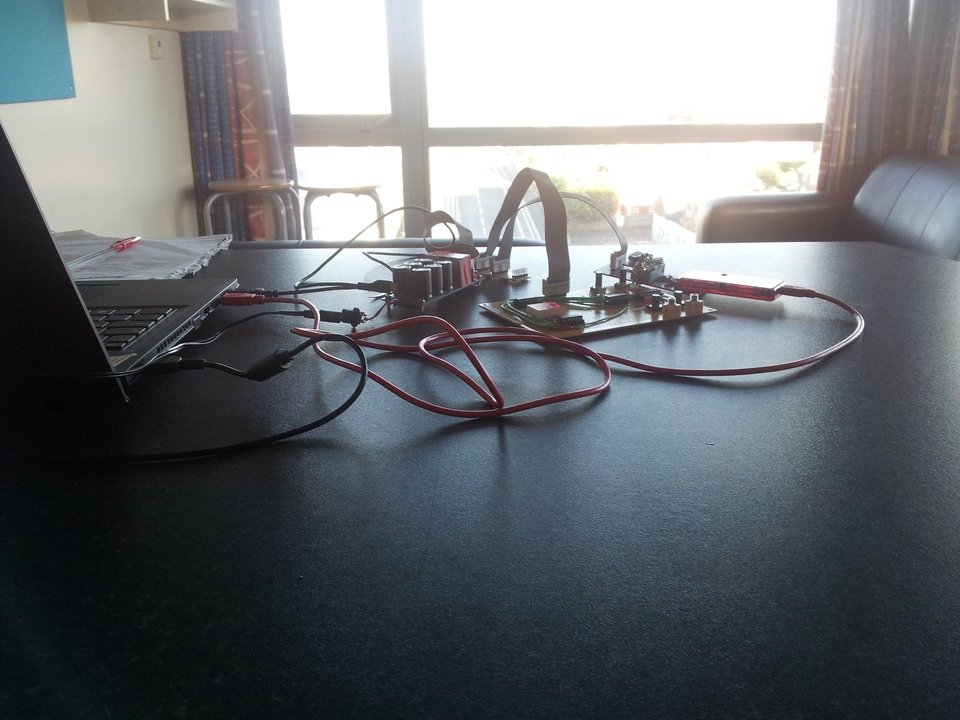 Polygraf in development
The plan for the module also changed. Rather than recording beats and outputting these through drum modules, the four outputs would be connected to a CD4514 4-to-16-line decoder.
Each of these 16 lines would then be connected to potentiometers, such that each line has its own voltage value, which would then be mixed together to create a voltage that could be used to control a synthesiser to produce tunes and melodies. As such, the module was now intended to produces notes, rather than just control drums. It would essentially be a funky analogue sequencer.
This circuitry didn’t bother me too much, as it wasn’t something I wasn’t too concerned about this extra circuit, as it did not require any additional programming - the core PIC would remain the same.
I had a certain level of fondness for the original idea as a drum-machine (ie, without the extra circuit), but Frequency Central thought strongly that the extra circuit made a much more desirable product… okay then.
Polygraf
I worked on and off on the Polygraf for a long time. I made significant progress during Summer 2015, but external factors such as my Degree and Internship prevented me from completing it.
I decided during my winter break (when I should probably have been revising for my exams!) that I would complete the project before I went back to University.
My Father was amazed with the completed project. We hadn’t built the CD4514 circuit yet, so we connected the digital outputs to some TipTop Audio drum modules. He loved how simple the seven segments made the module to use, and he happily spent some time programming new sequences into it from artists he liked, or from the top of his head as the mood struck him.
To my delight, he even decided that the Polygraf functioned well enough as a drum machine sequencer to sell it as a stand-alone module, rather than insisting on making it an analogue sequencer with the additional circuit I described earlier. We decided to make that it’s own module - which became the Cryptograf - because it could feasibly be used with another module, like a clock divider, or just any four gate sources.
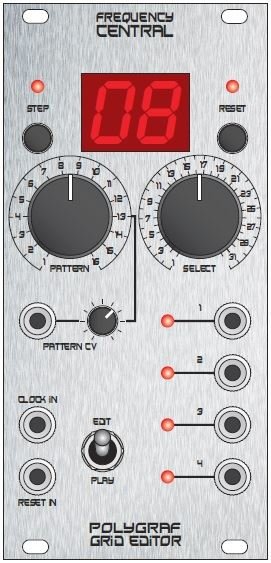 Polygraf Mockup
We made a visualisation of what the module could look like and got to work converting my prototype into a final product.
Production Prototypes
By mid 2016, we had a panel and PCBs assembled. I only have a picture of the panel of this iteration for some reason.
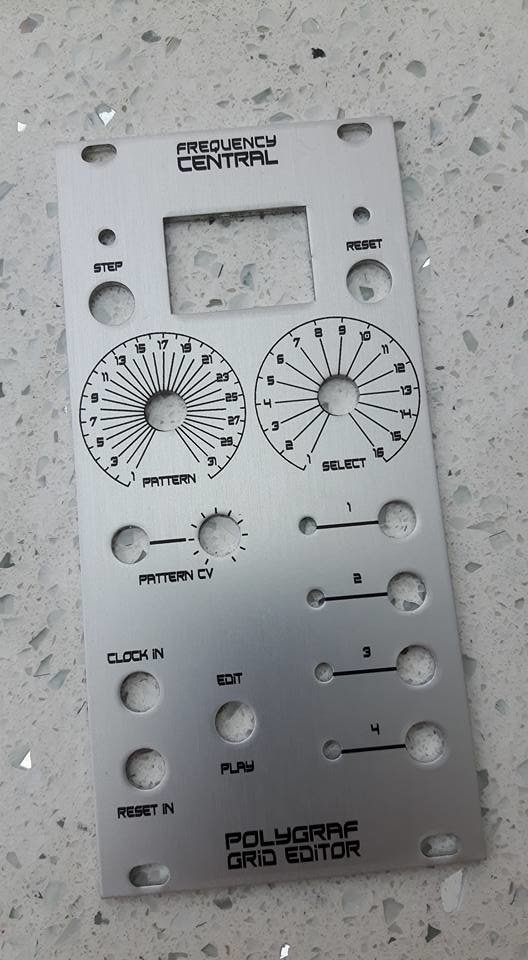 Polygraf Panel
Unfortunately, this was one of the first PCB projects that Johnson Dunn (our ‘resident’ PCB designer) made, and everything didn’t quite fit together correctly as he misjudged the width of the 7 segment displays. He also didn’t follow best practices (that he went on to learn later), so he had to re-engineer it from scratch to release the project and thus the project didn’t see release for another long period.
Pre-Programmed Patterns
In Summer 2018, it was time to determine which pre-programmed patterns and sequences should be present in Polygraf. We contacted a few musicians that we knew, who gracefully provided us with a few beats. We also included some beats taken from popular 80s songs, and a few that we wrote ourself. We even included a couple of easter egg patterns.
By this time, we had a prototype of Cryptograf and so were able to test our sequences in Cryptograf too. We realised that whilst drum modules needed triggers, something like Cryptograf needs gates. Cryptograf can’t work with triggers because it would only briefly go to the correct state before reverting to state 1. Drum modules can’t work with gates, because they wouldn’t re-trigger when the same output should be on twice in a row. It was clear that we needed a Triggers/Gates switch, something that was missing from the original prototype.
I also later invented the ‘Triggate’ concept, which is a hybrid of a trigger and a gate. It’s like an inverse trigger - a trigger that idles at high like a gate, and goes low for a very short duration. The Triggate activates a drum module because there is a rising edge, and because it spends most of the time in the high state, it works well enough for something like Cryptograf too - the time spent in state 1 is imperceptible. We changed our Triggers/Gates switch to be a three position Gates/Triggates/Triggers switch, and it works well to allow Polygraf to control drum modules (like Seismograf) at the same time as you control Cryptograf, without needing two separate Polygrafs.
We recorded this demo of Polygraf controlling Cryptograf at around this point in the development process. It’s pretty cool, though admittedly the focus is on Cryptograf’s features, not Polygraf:
Sequence Chaining
Whilst developing Neograf - a module based on Polygraf that outputs notes rather than drum triggers - we realised that it was really important to be able to naturally chain sequences to be 32 step, or 64 steps long. A melody is unlikely to be completed within just 16 notes, after all. So we developed a switch for Neograf that allowed it to play 16, 32, or 64 step long sequences. So what does this have to do with Polygraf?
Well, initially nothing. We didn’t see a way to make this code work for Polygraf, as Polygraf didn’t have any remaining inputs. It was only after we developed Neograf further that we realised the ‘State/Note’ input (for both modules) was only used during Record mode, and not during Play mode. Therefore we can multiplex the purpose of the State input. For Neograf, this meant that we could use it for adding Bias. For Polygraf, this meant that we could add sequence chaining. We realised this after we had already taken orders for it, so I had to act quickly!
In Polygraf, sequence chaining is changed by rotating the State knob whilst in play mode. We added the 16, 32, and 64 step modes found in Neograf, and an additional mode, “4th pattern change”, where it plays the same pattern three times whilst changing for the fourth, which can be used to add an interesting twang to the beat.
Conclusion
Polygraf was released (along with Chronograf, Cryptograf, and both versions of Seismograf) when we launched the new Frequency Central website in mid-November, 2019. It’s too early to see what the user reaction will be, but I’m hoping that people will really enjoy the module. After 5 years in development, hopefully it will have been worth the wait.
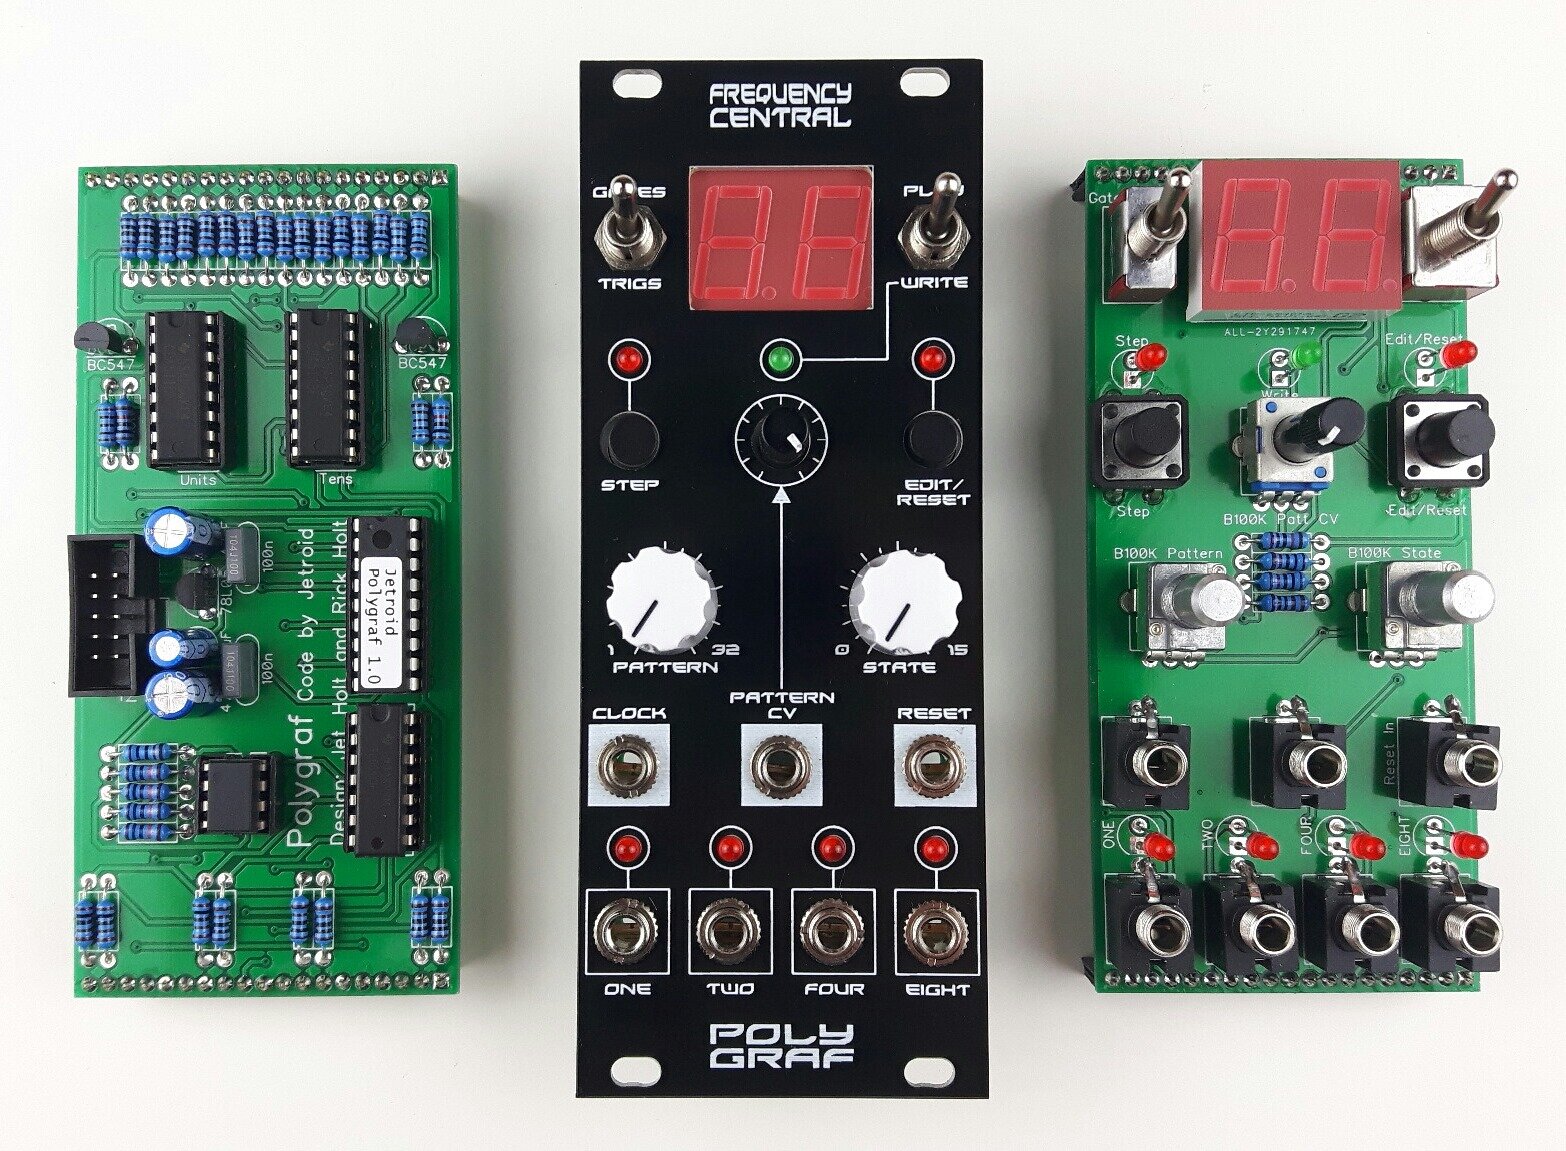 Polygraf Production Model
I’m really happy with Polygraf, as it was collaboratively developed along the whole process, and grew naturally from idea to idea. It took a long time to release, but I’m glad we waited because every additional period improved the product. It aged like wine in a barrel. :)
We later made a gate/pitch version of Polygraf called Neograf…
P.S. I'm late to the party, but I recently got a twitter account that you can follow here.